The Rise of Vibe Coding
With Vibe Coding it’s the same as with Agile: a reasonable idea gets ruined by misunderstanding, and this gets worse as the hype continues. This may happen if an idea is applied blindly, or even forcibly, and the result is far from what was anticipated. Losses instead of profits, and so on. Is it still not too late?
First, let’s try to understand what Vibe Coding really is. We can find an informal definition on Wikipedia. By Vibe Coding, we mean a completely different approach to coding: a chatbot-based approach rather than an assistant-based one. The developer no longer works with the code directly, but rather develops via a series of prompts, letting the GenAI agent provide the implementation. The developer focuses on problem definition, testing, and providing feedback, also via prompts. Looking at the simplified coding assistant anatomy diagram below, we can see that the agent mode (the heart of Vibe Coding) is the most sophisticated and autonomous component on the right, finally capable of comprehending written software as a whole.
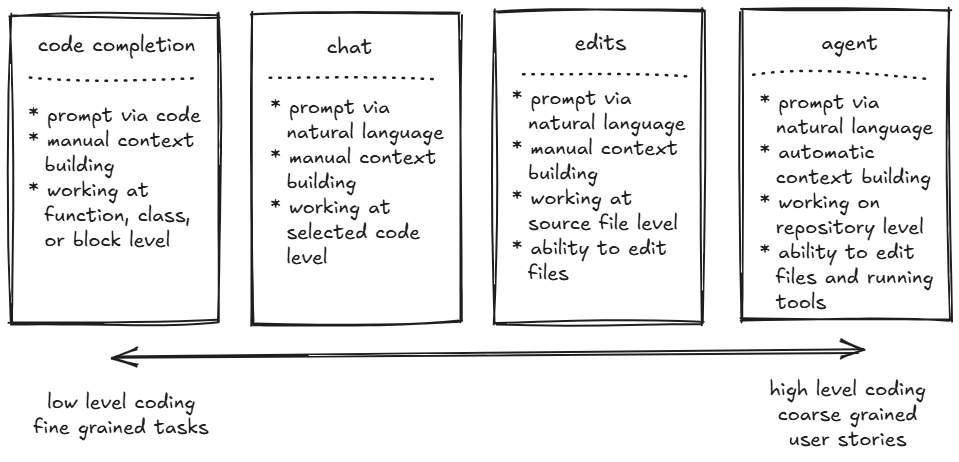 Anatomy of AI coding assistant, based on GitHub Copilot.
According to the aforementioned definition, the following points characterise Vibe Coding:
- The developer no longer micromanages the code.
- The developer accepts the generated code without fully understanding it.
- The developer tests the generated code at runtime. If there is any misbehaviour, the developer uses further prompts to ask the AI to fix the problem.
The apparent consequence of this approach is that it is no longer necessary to have programming knowledge or to understand the details of frameworks or libraries in order to model data or algorithms properly. In other words, software engineering skills are no longer necessary to write an application.
As I have previously suggested in another article, uncontrolled code generation without properly established architectural restrictions may lead to rapid quality degradation and exponential growth in complexity, consequently resulting in the technical death of the code base. This is, of course, something that I cannot yet prove.
So, with this vague definition and an enormous wave of hype surrounding everything related to generative AI, we are clearly on the path to trivialising yet another IT term: vibe coding!
The Experiment
In my free time, I do some assembly coding for an outdated machine called the Commodore 64, which premiered around 1982. To make my life easier, I have incorporated modern tools such as cross assemblers and CI/CD pipelines.
 That’s a Commodore 64 — I’ve owned one since 1990. The blurry badge proudly reads: ‘Personal Computer’.
The majority of my GitHub repositories are MOS 6502 assembly projects, except for one called Retro Build Tool (RBT), which is essentially a Gradle build system plugin implemented in the Kotlin language. RBT is simply a Gradle plugin that knows how to build assembly projects for Commodore 64.
RBT is not a large project; it currently comprises around 13,000 lines of code, but its complexity means it is not straightforward. It is comparable to the typical microservice. If vibe coding works for this project, it should be useful for real-life microservice-based codebases. However, if it fails, it cannot be used as a reliable development method for the majority of existing software.
One problem I have noticed while working with RBT is that, although it offers a seamless experience with simple, straightforward “one-pass” assembly projects, it struggles with more complex work. For example, when I started working on Tony: Montezuma’s Gold and moved beyond the one-file demo version, I discovered that RBT now needs to support a multi-module, multi-part project with two compilation targets: a 5.25” floppy disk and a ROM cartridge in Magic Desk format. I had to include packing, as the assets were really big, as well as a kind of linking: an intermediate compilation step followed by additional compression, and then another compilation to the desired format (disk image/ROM image).
I was able to do this within Gradle using a lot of custom ad hoc tasks and CLI commands, but the result was rather messy. Another problem was that the execution was sequential and took a long time. This is because I know very little about the Gradle API; the documentation is rather cryptic, and this is a project in my free time. Apparently, free time is not enough in my case! I know Gradle can track file changes and run only the necessary tasks, and it can even parallelise tasks, but I had no idea how to write a plugin that uses all these features.
So, I created some entries in my backlog and left them for the next six months. This is a very good topic to start playing with agent and vibe coding, isn’t it?
How do I work?
I choose GitHub Copilot as a plugin into IntelliJ Ultimate IDE. The tool, as for now, supports code completion (via CODEX model), chat and edits function and, of course, an agent mode.
Agent mode supports following models without limitations (included in the license):
- GPT-4o
- GPT-4.1
Additionally, following premium models are available:
- Claude Sonnet 3.5
- Claude Sonnet 3.7
- Claude Sonnet 4
- Gemini 2.5 Pro
- o4-mini (preview)
The Gemini and o4 models were in preview, but I noticed today that the Gemini model is now GA. The premium models have limits; all but the o4-mini cost the same (1x tariff), while the o4-mini is much cheaper (0.33x tariff).
GitHub Copilot also supports an instructions file in Markdown format that can be stored in the project repository and shared across the team. However, I don’t have a team.
I prefer a careful approach and don’t accept much risk; therefore, I gave up on naive usage of the agent. I know that the agent mode (as well as other coding agents) is implemented internally as a “plan and execute” agent, so I have configured my Copilot to externalise the plan into a file that I store in my project repository and use in subsequent iterations of my work with the agent.
So, my work basically requires three kinds of prompts:
- User story prompt specifying the feature that needs to be implemented that results in planning the work and storing the action plan in separate MD file.
- Execution prompt asking to execute certain points from the action plan.
- Enhancing the plan prompt asking to extend existing plan with new facts, decisions and points.
It would be tedious to orchestrate the agent so that it does exactly what I want (planning, execution, enhancement, updating the plan document, etc.), therefore I use the copilot instructions file as a kind of system prompt. Let’s take a look at my instructions file.
Coding guidelines
…a place to put your specific guidelines, including architecture guidelines…
Testing guidelines
…a place to put some more details on how test automation is done…
General notes on working approach relevant for Agent mode
Tools
- We use Powershell so always use syntax of powershell when running commands. In p articular do not use
&&.- Use
gradle buildto quickly compile the client code- Use
gradle testto run all tests in the client code- use
gradle spotlessApplyto format the code according to the coding style- always run
gradle spotlessApplyafter creating or editing any source files to ensure the code is formatted correctlyPrepare plan
Always use this approach when user asks in agent mode to create an action plan. At the beginning of each task, prepare a plan for the task. If not specified in the user prompt explicitly, ask user for a feature name to name the plan MD file accordingly.
- Identify Relevant Codebase Parts: Based on the issue description and project onboarding document, determine which parts of the codebase are most likely connected to this issue. List and number specific parts of the codebase mentioned in both documents. Explain your reasoning for each.
- Hypothesize Root Cause: Based on the information gathered, list potential causes for the issue. Then, choose the most likely cause and explain your reasoning.
- Identify Potential Contacts: List names or roles mentioned in the documents that might be helpful to contact for assistance with this issue. For each contact, explain why they would be valuable to consult.
- Self-Reflection Questions: Generate a list of questions that should be asked to further investigate and understand the issue. Include both self-reflective questions and questions for others. Number each question as you write it.
- Next Steps: Outline the next steps for addressing this issue, including specific actions for logging, debugging and documenting. Provide a clear, actionable plan. Number each step and provide a brief rationale for why it’s necessary.
After completing your analysis, create a Markdown document with the following structure:
# Action Plan for [Issue Name]

## Issue Description
[Briefly summarize the issue]

## Relevant Codebase Parts
[List and briefly describe the relevant parts of the codebase]

## Root Cause Hypothesis
[State and explain your hypothesis]

## Investigation Questions
[List self-reflection questions and questions for others]

## Next Steps
[Provide a numbered list of actionable steps, including logging and debugging tasks]

## Additional Notes
[Any other relevant information or considerations]
Ensure that your action plan is comprehensive, follows a step-by-step approach, and is presented in an easy-to-read Markdown format. The final document should be named .ai/feature-{feature name}-action-plan.md
Execute plan
- When developer asks for executing plan step, it is always meant to be a step from the next steps section of the action plan.
- When developer asks for complete plan execution, execute the plan step by step but stop and ask for confirmation before executing each step
- When developer asks for single step execution, execute only that step
- When developer asks additionally for some changes, update existing plan with the changes being made
- Once finishing executing of the step, always mark the step as completed in the action plan by adding a ✅ right before step name.
- Once finishing executing the whole phase, always mark the phase as completed in the action plan by adding a ✅ right before phase name.
- If by any reason the step is skipped, it should be marked as skipped in the action plan by adding a ⏭️ right before step name. It should be clearly stated why it was skipped.
- Always update action plan with relevant findings during plan execution, such as new questions, new contacts, new codebase parts, etc.
Get current version of “copilot-instructions” file here.
As you can see, you can include a lot of useful information in the instructions file, but bear in mind the LLM limits and aim to be brief and concise. The key information is included in the General notes on working approach relevant for Agent mode section.
- In the Tools subsection, I explain how to use the useful tools available for the project. That’s right — my Gradle plugin project uses Gradle as a build tool itself, and the build file contains everything the agent needs to work and verify the results.
- In the Prepare plan subsection, I explain exactly how the plan should be created and what its structure should be. This is a kind of ‘one-shot’ prompting technique that deliberately covers the user story prompt (see above).
- In the Execute plan subsection, I explain exactly how the agent should execute the plan, which covers both the Execution prompt and the Enhancing the plan prompt (also mentioned above).
Sample prompts
Having completed all the preparations described above, I can start vibe coding simply by selecting Agent Mode in the Copilot plugin and entering a prompt that describes the problem.
Currently, all tasks in the project are executed sequentially, not leveraging parallelization feature of Gradle. This results in very long build times for complex projects that execute compilation, preprocessing and postprocessing of long projects. Propose a new bounded context named ‘flows’ that will allow to organize tasks into chains (flows) that can depend on each other (outputs of one flow can feed input of another flows). This new flow mechanism should have a separate, new DSL syntax. Create an action plan.
Using Claude’s Sonnet 4 as a model, I came up with the following action plan:
Action Plan for Flows Parallelization Enhancement
Issue Description
Currently, all tasks in the Retro Assembler Plugin are executed sequentially, not leveraging Gradle’s parallelization features. This results in very long build times for complex projects that execute compilation, preprocessing, and postprocessing. The existing
flowsbounded context exists but lacks implementation. We need to enhance it with a new DSL syntax that allows organizing tasks into chains (flows) that can depend on each other, where outputs of one flow can feed inputs of another flows, enabling parallel execution.Relevant Codebase Parts
- flows/ - Empty bounded context directory that needs to be populated with domain logic and adapters
- infra/gradle/src/main/kotlin/com/github/c64lib/gradle/RetroAssemblerPlugin.kt
- Main plugin where tasks are currently registered sequentially
- shared/gradle// - Contains existing DSL extensions and task utilities that need to be enhanced
- compilers/kickass// - Kick Assembler integration that represents the main compilation flow
- processors// - Various processor modules (charpad, goattracker, image, spritepad) that can be parallelized
- dependencies// - Dependency resolution that can run in parallel with other tasks
- emulators/vice// - Testing execution that depends on compilation outputs
- buildSrc// - Contains Gradle plugin definitions that need enhancement for flow support
Root Cause Hypothesis
The current architecture treats each task as an independent Gradle task with simple dependencies, but doesn’t leverage Gradle’s built-in parallelization capabilities. The missing piece is:
- Flow Definition DSL - A way to define task chains with explicit input/output relationships
- Dependency Graph Analysis - Logic to analyze which flows can run in parallel
- Task Orchestration - Enhanced task registration that respects parallel execution capabilities
- Resource Management - Proper handling of shared resources and output artifacts
Investigation Questions
- What are the current bottlenecks in build execution time?
- Which tasks are independent and can run in parallel (e.g., different processors)?
- What are the input/output dependencies between different task types?
- How should the new DSL syntax look to be intuitive for users?
- What Gradle features should we leverage for parallel execution?
- How do we maintain backward compatibility with existing build scripts?
- What validation is needed to prevent circular dependencies in flows?
- How do we handle error propagation in parallel flows?
- What monitoring/logging is needed for parallel execution debugging?
- How do we test the parallel execution scenarios effectively?
Next Steps
Phase 1: Domain Model Design (Steps 1-3)
- Design Flow Domain Model - Create core domain entities for Flow, FlowStep, FlowDependency, and FlowExecutor in the flows domain
- Rationale: Establishes the foundational business logic for flow management
- Define Flow DSL Syntax - Design the Kotlin DSL syntax for defining flows in build.gradle.kts files
- Rationale: Users need an intuitive way to define parallel execution flows
- Create Flow Dependency Graph - Implement logic to build and validate dependency graphs between flows
- Rationale: Essential for determining which flows can execute in parallel
Phase 2: Core Implementation (Steps 4-7)
- Implement Flow Domain Layer - Build the core business logic for flow execution and dependency management
- Rationale: Contains the parallelization logic independent of Gradle specifics
- Create Gradle Adapter Layer - Build adapters that integrate flow domain with Gradle’s task system
- Rationale: Bridges domain logic with Gradle’s parallel execution capabilities
- Enhance Plugin Registration - Update RetroAssemblerPlugin to register flows instead of individual tasks
- Rationale: Enables the plugin to orchestrate parallel execution
- Implement Flow DSL Extension - Create Gradle extensions that provide the flow DSL to build scripts
- Rationale: Provides user-facing API for defining flows
Phase 3: Integration and Testing (Steps 8-10)
- Create Integration Tests - Build comprehensive tests for parallel flow execution scenarios
- Rationale: Ensures parallel execution works correctly and safely
- Update Existing Task Implementations - Migrate existing processors and compilers to use flow system
- Rationale: Leverages new parallelization for existing functionality
- Performance Benchmarking - Implement benchmarks to measure parallelization improvements
- Rationale: Validates that the changes actually improve build performance
Phase 4: Documentation and Release (Steps 11-13)
- Update Documentation - Enhance AsciiDoctor documentation with flow DSL examples and migration guide
- Rationale: Users need clear guidance on using the new parallelization features
- Update CHANGES.adoc - Document the new flow parallelization feature and breaking changes
- Rationale: Maintains project change log as per guidelines
- Create Migration Examples - Build example projects showing before/after flow definitions
- Rationale: Helps users adopt the new parallelization features
Phase 5: Advanced Features (Steps 14-15)
- Implement Flow Monitoring - Add logging and metrics for parallel execution debugging
- Rationale: Essential for troubleshooting parallel execution issues
- Add Flow Validation - Implement compile-time validation for flow definitions and dependencies
- Rationale: Prevents runtime errors from misconfigured flows
Additional Notes
- Backward Compatibility: The implementation should maintain compatibility with existing build scripts while providing migration path to flows
- Error Handling: Parallel execution requires robust error handling and propagation mechanisms
- Resource Contention: Consider file system and memory resource management for parallel tasks
- Testing Strategy: Focus on BDD-style tests using Kotest’s Given/When/Then DSL as per project guidelines
- Gradle Integration: Leverage Gradle’s built-in parallel execution features rather than implementing custom threading
- Performance Monitoring: Include metrics collection to validate performance improvements and identify bottlenecks
Get latest version of this action plan here.
I received a very detailed plan consisting of 15 steps, which were divided into five phases. I received an identification of potentially relevant files and resources. I have a root cause hypothesis describing why I need this feature and why the current implementation is not good enough for me. Finally, I have a set of reflective questions showing how broad the context and scope of thinking for the selected model is.
I can review this plan at any time, manually correct it if necessary, and then use it as an attachment to any interaction with the agent. Even if I exceed the token window, I can create a new conversation, put the plan into context, and continue with a much smaller penalty than if the agent had to plan the work from scratch.
Preliminary conclusions
I have successfully implememented three features using this technique:
- I have prototyped flow DSL and created placeholders for all types of flow steps that I would need.
- I have implemented assemble step and integrate it with existing Kick Assembler task.
- I have implemented CLI step allowing to execute arbitrary CLI command in the flow.
I have tested the generated code and confirmed that it already supports file sensing and differential builds. However, it still does not use parallelisation.
I was able to recover from at least 80% of problems with code generated by the agent via further prompting, either directly in the conversation or, in more complex cases, by enhancing the existing action plan and executing the newly added steps. Occasionally, I had to type ‘continue’ because the agent exceeded its tool execution limits. On only two or three occasions did I need to manually fix the code, although the agent would most likely have been able to fix this problem itself. The only time I had to give up and discard all changes was when I tried to rely on GPT models only.
Nevertheless, it is advisable to commit to Git frequently, after each iteration, because the agent sometimes performs erratic actions, such as erasing the entire contents of the action plan.
I spent around 12 hours coding with the agent and used about 25% of my monthly premium token quota (yes!). That’s a lot, but I mostly used the Claude Sonnet 4 premium model.
A rant on models
Once I discovered how quickly premium credits get consumed, I tried different models.
 - What kind of model did you choose? - Abby. - Abby what? - Abby Normal!
I always started with any of Claude Sonnet models, but after a while I decided to use version 4, as it seemed to be the fastest. I strongly prefer Claude for planning purposes.
The Gemini model usually failed to execute, but that was when it was still in the ‘preview’ phase.
I fell back to GPT models and was appalled by their performance, especially that of GPT-4o. Both models have a very limited token window, require frequent restarts and have significant issues with tool usage and output capture. GPT models were also prone to hallucinations.
 A LLM prepares to use a tool, properly.
Other than Claude, the only model capable of executing the plan with good results is o4-mini, although it can be very slow (it’s still in preview). o4 seems to be a good choice, especially since it costs only 30% of a Claude model.
I have had some positive experiences with GPT-4.1, including creating plans with that model. However, it still requires a lot of work on my system prompt to be fully useful.
Hypothesis: GPT-4.1 is an economical approach for simple tasks, Claude Sonnet 4 + o4-mini are best combination for most complex tasks. If you can afford, use Claude Sonnet 4 solely.
So my current ranking of models is:
- Claude Sonnet 4 (3.7, 3.5) - best
- o4-mini (preview) - ok
- GPT-4.1 - acceptable for simple tasks
- GPT-4o - don’t use it
- Gemini 2.5 Pro - no idea, preview version usually didn’t work
A rant on the future
If you are a software developer, please read this carefully. Of course, I cannot see the future, and this is just my opinion, but I think that:
- Knowledge of multiple programming languages is no longer advantageous. With the AI Agent, it is sufficient to know a single language well, and to understand programming paradigms rather than concrete syntax. I know Java very well, but only a little Kotlin, despite my project being in Kotlin.
- Knowledge of multiple frameworks is irrelevant. You need to understand the concepts (e.g. SPA, IoC) and let AI handle the specifics. I don’t understand the Gradle API well enough, but AI fills that gap.
- Knowledge of algorithms is no longer essential, but you need to understand complexity if you care about performance or resources. You need to know how to instruct AI in this respect.
- Forget about knowledge of libraries — as long as it’s mainstream, AI will do it for you.
If you are an IT interviewer, consider points 1-4 and rethink the questions you used to ask.
What do you need to know?
- You need to know how to define the problem using natural language. In other words, you need to possess some domain and business analysis skills.
- You need to know how to define and protect the architecture. As I wrote here, I don’t believe that architecture has lost its significance.
- You need to be ready to jump in. At the current stage of tool maturity, this means you need to be able to understand the generated code well enough to fix it manually.
To me, it seems that the AI Agent still rewards seniority. We are not yet at the stage where engineering skills can be completely eliminated from software development. As always, and especially on commercial projects, it is highly advisable to proceed with caution. Perhaps in the future one will see the “plan and execute” technique as “prompt overengineering”, but for now it’s still useful to understand how it works.
In subsequent articles, I will describe my journey in detail. I will share more prompts, action plans, and complete Git branches with all the Vibe coding history.